


1.Installation for SMC Drainage Grating
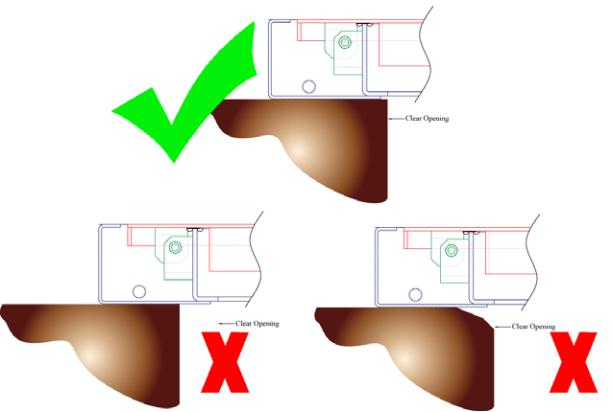
● The structural opening of the chamber must not be greater than the clear opening of the product and must be of sound construction in line with the load classification of the product.
● Ensure that the seating area around the chamber opening is clean and clear of all debris and dust; wash down with water if necessary. Failure to clean the seating area adequately may lead to an unsatisfactory installation.
● Set the levels of the product by use of bedding concrete
● If packers are not required a continuous layer of bedding concrete with a minimum thickness of 12-15mm should be applied to the seating area around the whole of the chamber opening.
2.Care and Maintenance.
● lthough our products are generally maintenance free, good practice on an annual basis is recommended to ensure the product continues to perform well. Such care would involve inspecting and removing any dirt or grit, externally and internally around the cover, and to grease the seating areas, screws, hinges and any moving parts with moly grease which is available from Peter Savage Limited (see contact details above).
● A visual inspection of the bedding material and reinstatement of any identified problem areas mayprevent product failure in the future.
● Lower the product into a central position over the chamber opening and onto the layer of bedding concrete. This bedding material must support the total surface area of the frame, as an unsupported
frame may potentially impact upon the performance of the finished product. This may cause
distortion and ultimate product failure. The product lid (whether recessed, solid top or grating)
may need to be removed (or opened for hinged products) to aid the correct positioning of the product.
Once the product has been located centrally the lid/s should then be returned to the closed position
before continuing.
● Product frames are provided either with a flange or fixing pad (with or without pre-drilled holes
for up to M12 fixings) depending on the product design.
● Once the bedding mortar has set and where fixing pads are present, drill through the fixing holes
for M12 fixings on the flange of the frame and install these fixings. We suggest fixing at central
locations first and then work outwards on each side.
● With the levels set, the trays/lids may be operated several times, to check correct positioning and
operation. Also where locking screws are employed, care must be taken to ensure that screws are
correctly aligned so that operation after installation is non problematic.
● We strongly recommend that the external grouting/backfilling, which can now take place, is carried
out with the products lid/s in position and locked in place if screws are present. Backfilling
should never take place without the products lid/s being returned to the closed position within the frame
(and locked if screws are present) as distortion of the frame or tray due to weight of the grout
will prevent correct operation of the products lid/s.